25 November 2012

Floorplan comparison

Here is another bit of comparison, for those who might want it. This is the floorplan of the house as we are guessing it was originally built, based on what we have found during renovations, compared to the floorplan from the catalog.
Differences:

  • The tiny foyer was left out. Not uncommon.
  • The closet's doors were reversed whenit was built, either error or by request of the original owners, and its intervening wall was also omitted (we removed the closet wall into the large bedroom to make space for modern bedroom furniture, so it's gone now).
  • The location of the back door is guessed,  that wall was turned into a cutout into an extension onto a porch addition sometime between 1921 and 1950.
  • The dining room windows are assumed based on the catalog plan, also, because there was a poorly tacked on bay added in the 20s, at which time the entire dining room wall was removed. The bay was centered on the original window configuration, and is therefore not centered on the dining room itself. The plan's locations for these windows made the strange offset finally make some kind of sense!
  • The kitchen door was set in the hallway, rather than in the dining room, probably to accommodate an existing coal cook stove (left hand side orientation of the stack, probably, and perhaps a right hand side access for the ash or coal? Wish I knew!).
  • I have not yet taken down a later corner cabinet where the pantry window was supposed to be, to see if there is a repair to the plaster there. On the exterior, this area is partially covered by the added on bay, so no evidence shows there.

Another change made after building was an opening into the dining room from the front bedroom/study. I omitted it because I found evidence that it was altered later. We have filled it in and plan to add a built in buffet in that space.
Next update will show the current configuration of the house, contrasted with the plan. That's all for tonight.

21 November 2012

A Little Comparison, a Few Conclusions.


So, today I got out and took a photo of the house from nearly the same angle as the catalog photo. Not quite, but close enough to do an overlay. I need to scoot over about three feet and take another picture, but that has to wait for the camera to recharge. As it was I ended up using the webcam on my tablet and guessing the angle, because I got out there, set myself up to shoot based on the catalog image on the tablet and had a dead camera. Got to love modern technology, huh?
The front bedroom window and front corner line up. The replacement front steps line up with the originals. The roof line might line up if I can somehow get more on a level field with the house. Maybe by standing on a chair on the raised sidewalk across the sunken street. The lack of dormers is glaring, and I know those were there, you can see their ghosts inside the attic. The chimney doesn't line up, but that may be due to the error in aligning the photo just right. The modern siding on the now-enclosed front porch thankfully wasn't continued around the whole house, but the eave overhang was inexplicably closed in with ugly flat ventilation soffit and I fear that the lovely shaped rafter ends were likely trimmed or removed to fit under it. At least the rest of them were not covered up.
It has really underlined how much has happened to the house in its 100 years. I am both happy about this and sad, but not surprised.
I have the front porch interior half painted (the kids' half, of course) and I discovered something that is significant and not unexpected. I knew the sheathing of the columns had to have been either mangled or stripped away in order to put up the siding and interior paneling. I found the ghosts of the columns etched into the old exterior front wall, at both ends. The angle of the column sides and shape of the capitals match those in the catalog picture. This will give me something to work from when we restore the porch. While we want to keep it enclosed, it will be changed to a more sensitive style of enclosure, with the columns replaced, exposing or replacing the curved beams, removing the awful siding and soffit panels, reshingling the porch wall up to the rail and putting in more period appropriate steps, windows and front door. It is an ambitious plan. It is one of the last things on our list.
One more thing - the floor plan in the catalog shows the dining room windows are not centered on the dining room wall. The addition, put on in the 20's (and done by an awful contractor I would love to have some harsh words with), is also not aligned to the center of the dining room. It is off by almost, but not quite, a foot. The discrepancy in one explains the otherwise random discrepancy in the other. It looks as if they laid the foundation for the bay addition, aligned to center on the pair of windows, then tore out the wall, and discovered that it was out of line with the room.

08 August 2012

Kitchen in progress, Part 1

So, we decided to change our plans. No Ikea kitchen for us. No prefab cabinets at all. We are going totally custom, and doing it ourselves. ALL of it. Cabinets, sink, 20's style banquette, and built ins.

Not exactly this, anymore.
Why? Well, frankly, Ikea is too far away to realistically be able to get spare parts, 6000 dollars is a lot to spend for not-quite-fitting cabinets, and ... a good friend of mine got defrauded by a cashier at the Atlanta GA Ikea, with a very poor response from Ikea loss prevention (I would not shop at that one for a while, folks. Go elsewhere). Thus, between the distance to the nearest Ikea and the bad taste that their treatment of my friend left in our mouths, we elected to take our business elsewhere.

Perhaps a bit more like this, instead.
The plan:
The layout will be very similar to the posted plan examples. Sink and dishwasher (yes, I have decided I want one) under the short wide window in the middle of the kitchen, double door fridge next to a pull out broom closet, cabinets up to the ceiling, banquette where the big 1940s/1950s double sink cabinet is now, stove on the wall with the chimney, racks/rolling worktops in front of the long windows. Lots of integrated stuff, a pull out trash bin, a fold-out ironing board set into the door of the broom closet, probably an appliance garage too. I'll be using furniture grade plywood for the cabinets and hardwood for the doors.

Tools:
Level, table saw (borrowed), finish nailer, drill, sander, router and table, and whatever else we already have or need to get or borrow.

A little of this one, too.

References:
The cabinets will be white, probably with chrome hardware. The appliances will be modern, but white. The floor will be white with black accents.  Backsplashes will be tiled, white with black and little bits of red. 

We are seriously considering doing a custom cast concrete sink and drainboard, and possibly cast-in-place concrete countertops. The other option being tile, as I love to lay tile on counters. Not so much on floors, but I am already committed to tiling the floor.

The walls will be white beadboard wainscot from lintel height to baseboard where they are visible, and bright red above (possibly there will be a frieze stencil design, but not too keen on that in a kitchen environment). The ceiling will be papered over the drop ceiling tiles with a tin-tile pattern relief paper, and that will be painted white.

There are no good pictures of my kitchen, it's a series of unfortunate shortcuts and concessions all piled on each other, ruining the original flow and wasting all the space. 
All of that is eventual. The current status is vinyl sticky tile, steel cabinets that don't fit the space (and which will become my laundry room cabinets after the reno), and not enough of them, the old sink cabinet that is over an unheated extension and is also falling apart despite heroic attempts to save it, and the new stove and fridge. The fridge is currently sitting where the stove will go, and isn't hooked to the water because that's not going to be over there. We'll run the line when we run the new supply and drainage lines for the relocated sink. Which would be the week after we get the pros to run the gas line back to where it used to be and close off the current stove line safely.

It only looks this good good because I faked up some subway tile with stone-pattern sticky tile. I had to. I hated it. See that curtain around the sink cabinet? It's hiding the doors and drawers that fell off. The banquette will go here, soon.

We have the fridge, so we can design, plan and fit the fridge wall cabinets around it now. I plan to build the frames and install them on their bases, and build and hang the wall cabinet frames. Doors can follow after the rest of major work gets done - I've removed doors as a cosmetic choice in when I was a renter, reinstalling on move out, so it won't bug me. A bonus to this is that we can take our time to hash out pulls and knobs. I don't want anything that might catch on my clothes or anything since it's a narrow space, Mr. Vintage House wants knobs and protruding handles. We have months to argue before this becomes an issue.

After that, the stove wall cabinets get built and installed, the stove gets moved, and we start on relocating the sink. After the sink is done, we will build the banquette under the corner windows and have someplace to eat besides the living room.

Progress, why does it feel like sliding backwards?

23 July 2012

Frieze Angst

Got my frieze paper samples from Bradbury & Bradbury.
They are breathtakingly gorgeous. And yet ... None of them is right.

The largest one, Land's End, is so ideally Arts and Crafts and so beautiful that considered spending far more than we had budgeted for this, but I simply can't pretend that it is not too large. And it's a coastal view, when I had wanted to echo the riverine environment of Southern Illinois.

 Of the others, which are riverine motifs, the second, River Frieze, is lovely on many counts. It is our hoped for theme, a more modest size that would work well with a lower wall placement, and an entirely budget friendly price, but it is far too much green when paired with our wall paint. The third, Birchwood in the new Rookwood colorway, is perfect, all the colors are ideal and don't overwhelm with the pain we chose, but it is too small. Much too small, even in the new larger format released recently, because this border would need to be placed above the picture moulding to look right in this space. Alas. I had such high hopes, but our space had other plans and our budget rules out asking for a custom print job.

 My next idea is to paint a frieze myself. I can and do paint, landscapes especially well, and murals aren't unknown to me. I can get the colors just right, and I can make it fit. Now to sketch it out.

I've created a board on Pinterest just for collecting inspiration photos. I am thinking of sketching out a 12 foot section and repeating it, or possibly going mostly freehand all around the room. Also, incising the pencilled design into the plaster before painting is looking like a nice touch. I am researching period decorative painting methods right now.

14 July 2012

Insulation for the WIN!

It's been quiet around here, but we've been busy with PeeWee Baseball and summer vacation.

Speaking of summer, it has been astonishingly hot. So hot I could barely use my own kitchen, since it would get about 10 degrees hotter in there than outside, if I wasn't cooking (on the highest days, that meant it got to above 115 in there). The rest of the house was really just barely tolerable, with two window units going full blast we got it down to the high 80's or low 90's in the rooms with a/c.

So, between bouts of heatwave, we ponied up about 200 dollars and my husband and our good friend J put GreenFiber blow-in cellulose in the attic. It took them about 4 or 5 hours, including breaks. The attic is now insulated to R-19 or a little better (we used the r-19 calculation that didn't make allowances for framing, and then added one extra bale), and it has made an amazing difference. Mostly, it shows in that the house isn't heating up so fast in the morning, and the cooling is lasting longer with less active cooling being needed. It has made such a difference that we saw a 15-20 degree difference vs. outdoors in the rooms without air conditioning during the day, and 10 below the outdoor temp in the kitchen, even with the stove getting used on and off throughout the day.

This is my favorite thing so far: I was able use my oven and cook a full meal today, without getting heatstroke. Furthermore, our enclosed front porch, on the west end of the house, which is usually best described in warm months as "ovenly," was actually comfortable, and it got up to 92 outside. Usually it is already intolerable when it's up in the 80's. That bodes well for the next time triple digits roll in around here. And, frankly, it bodes well for wintertime as well.

Tomorrow, heat-reduction tint goes on the west-facing windows. That small improvement should also help the front porch be more usable through the year.

16 May 2012

I got it!

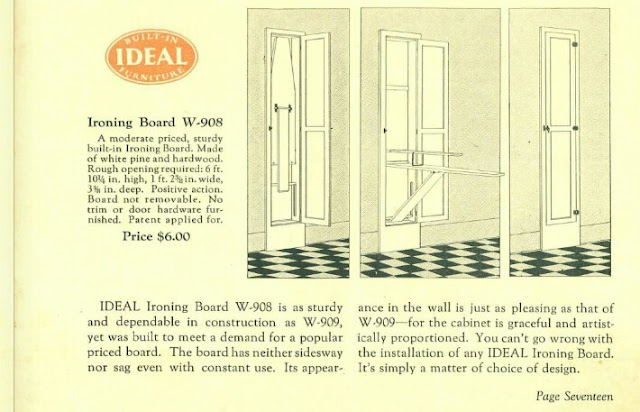
The foldaway built-in ironing board cabinet, that is. The door is there, the cabinet itself is in great shape, with all moving parts intact. It's very petite, so it will work perfectly in its intended use as an in-door mounting on a pull-out pantry cabinet.

It has the sleeveboard, and the pop-up support and the covers are still on both boards, so patterning new ones will be a breeze. It has never been painted, so no stripping needed!
Edited to add this image from a 1920s catalog for Ideal Furnishings, what looks to be exactly the model I found.
The folks I bought it from are moving, which why they are selling off their salvage. It is a pity, because they are awesome people.


15 May 2012

Blue Greasepencil

Remember the post about the greasepencil mark? Well, we reorganized our salvage lumber, and about eight of the studs (out of one 12' wall!) say "SP1" in black and blue greasepencil. There are also some carpenter's notation (lengths, probably for custom adjustments on site) on one or two pieces, in graphite.

Greasepencil is one of the identifying marks for kit homes.

14 May 2012

Wish me luck!

Why? Because I might have a line on a foldaway ironing board cabinet, salvaged, in what looks like decent shape. If I can get it, I will mount it as the front of a pull-out broom closet unit. in my redone kitchen.

Cross your fingers for me!

12 May 2012

I have never been so glad to be wrong.

What was I wrong about? Well, folks, remember this post? I thought the house wasn't a good match to the Aladdin Sherman from the 1912 catalog because of the measurements I had of the exterior.

Those measurements are based on the exterior measurements of the modern remuddled enclosed porch, over the vinyl siding. The vinyl siding adds about 6" to the width on each side, because it is simply laid over the original porch structure, including the rail. That structure isn't calculated into the footprint of the plans.

If you go by room dimensions, the house is IDENTICAL, except for the tiny foyer and pantry walls having been omitted. Well, and the closet dividing wall was also left out, and the closet doors were built in reverse of the original plan, the kitchen door was moved into the hall, and the pantry window was left out since there is no pantry wall. There are double doors into the den from the living room, plus that open arch into the dining room from the den that may or may not have been original, and which we temporarily filled in, so the room could be usable as a bedroom.

I am sure the house is a Sherman, now.

I just wish the scan was clearer.

23 April 2012

It's been quiet, but...

... that's because we are finally in our house, living here, and we even have internet! We moved in this last weekend, and I have a big backlog of stuff to show you. This is just a preview.

Before move in, we finished our bedroom. It's not perfect, we haven't had time to refinish the floor and blend the ex-closet floor into the bedroom floor, but it's all done on the walls and ceiling.


We also got a lot of the rough plaster repair done in the dining room, though it is far from finished.


One big thing I did was non-house carpentry. I built a base for my sons' Ikea Kura bed so that it could go from being a platform bed with a mattress under for a 7 year old and a 4 year old to a real big kids' bunk bed for a 9 and a 6 year old.