Arts & Crafts Homes Magazine. Looks fun. Might get a sub for myself for Christmas, but it might make me crazy.
Yep, still on hiatus. Mom says the yard looked really lovely this year. Wish I had seen it.
Possibly some real updates in Spring, but I plan to have a few more house research posts between now and then.
Happy Holidays!
29 November 2007
30 May 2007
02 May 2007
A Weighty Task
Spring has sprung. It's hot. But not really hot enough for air conditioners, unless we don't open the windows. Which, mostly wasn't possible, so we had to borrow an a/c unit from my mother. I'm putting screens into the storm windows right and left, but getting all the windows open, and keeping them that way is a nightmare. We ran out of short pieces of wood.
What's wrong with the windows, you might ask? You didn't ask. Well, I'll ask for you, in the interest of moving us all along.
The windows are quite well preserved, except for a couple in the dining room bay, but nearly all the sash cords have gone. All but one set, on the only window that apparently never got sunbaked. That window has been open for weeks, since it's now indoors, on both sides, and opening it does us no good. I replaced a set of cords in my son's bedroom, and I think I replaced a set in the back room (hereafter referred to as the Hole, until it's cleared and made into the dressing room), last summer.
Some progress, but not enough. No openable windows in, say, the kitchen, or the dining room, or the living room. We had used up the little bits of wood propping open our bedroom windows. So sleeping was possible. It was unbearable, even with fans everywhere, and mom's little borrowed a/c unit. Too hot.
So, I started the interminable task of pulling out bottom sashes and prying out access boards yesterday. I started with the other window in my son's room, so he could get actual cross-ventilation, and while I was working on it, I decided to take photos. For everyone else, of course. I really don't need a picture of this to remember it:What's wrong with the windows, you might ask? You didn't ask. Well, I'll ask for you, in the interest of moving us all along.
The windows are quite well preserved, except for a couple in the dining room bay, but nearly all the sash cords have gone. All but one set, on the only window that apparently never got sunbaked. That window has been open for weeks, since it's now indoors, on both sides, and opening it does us no good. I replaced a set of cords in my son's bedroom, and I think I replaced a set in the back room (hereafter referred to as the Hole, until it's cleared and made into the dressing room), last summer.
Some progress, but not enough. No openable windows in, say, the kitchen, or the dining room, or the living room. We had used up the little bits of wood propping open our bedroom windows. So sleeping was possible. It was unbearable, even with fans everywhere, and mom's little borrowed a/c unit. Too hot.
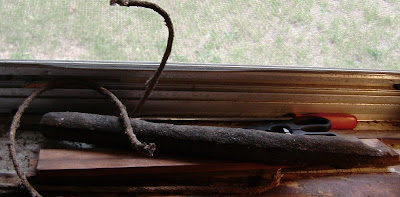
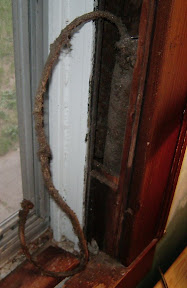
Yum. It's like a big metal poop, but covered with 80 years of dust and dead spiders. Just makes you want to do this, doesn't it? Actually, looking at this, you can kind of see why people just quit replacing the cords.
Let's start at the beginning. It's much less disgusting.
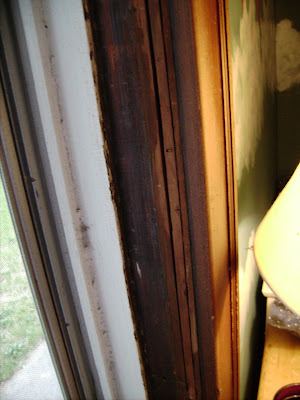
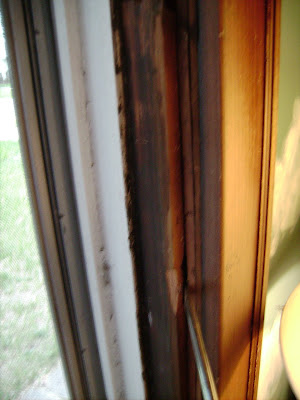
These instructions are for a "modern" house with repair access ports designed into the frames. You can tell if you have these by opening the window and looking for joints and/or screws in the tracks. Also, even though all our windows are double-hung, the upper sashes are painted into place and their cords are (unsurprisingly, as they were protected from the sun) in fine shape, so we're only working with the lower, inner sash and its cords. Pulling both sashes, stripping and restoring full sash movement is a whole other kettle of lead paint chips.
If you have a house that doesn't have this modern convenience added to the traditional double-hung window, you'll have to pull the trim to access the channels.
Get real replacement sash cords, not nylon (or any other synthetic rope - it won't hold the knots well at all) or cheap cotton cord (not strong enough). It's fairly high-test, and is treated with a very grabby sizing to help it keep the knots. You'll also need a hammer, a large flathead screwdriver or small prybar, a screwdriver for removing and replacing any screws, and a cutting implement. Another thing you want is a long stiff piece of wire with an open hook at one end - a repurposed coathanger is perfect. More on this later.
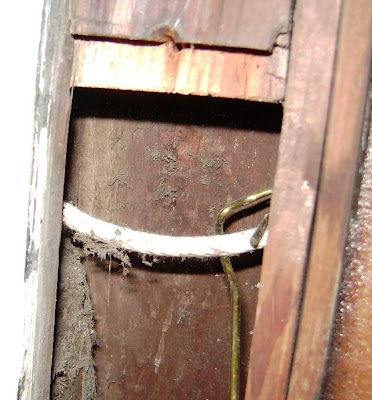
First, pry off the stop moldings, gently, and set aside. If there is a single cord, or if you are replacing cord before it gives way, cut the cord now. Grasp the lower sash firmly and pull it straight out and set aside, somewhere you won't step into or kick it. I know you won't and you know you won't, but do you want add a trip to the hospital and the home store, plus recreational re-glazing to your day?
Now, if there are screws holding in the access panels, rather than just friction and the pressure of the stop molding, remove them and put them somewhere safe, like a cup. You'll probably find some evidence of previous repairs, as I did. Only two of the prymarks I left behind were mine - the other dozen were already there. Clearly the cords had been replaced before.
Start by prying carefully. There might be a small nail securing the panel (these are under the window trim, where they occur, at my house, which meant either pulling the trim -all of it- or hacksawing the nail). Remove or cut the nail, depending on your level of commitment. The edge that is secured by this mail occurs under the stop moldings at my house, so I just cut the nail. Continue prying gently until the panel pops out.

Let's start at the beginning. It's much less disgusting.
These instructions are for a "modern" house with repair access ports designed into the frames. You can tell if you have these by opening the window and looking for joints and/or screws in the tracks. Also, even though all our windows are double-hung, the upper sashes are painted into place and their cords are (unsurprisingly, as they were protected from the sun) in fine shape, so we're only working with the lower, inner sash and its cords. Pulling both sashes, stripping and restoring full sash movement is a whole other kettle of lead paint chips.
If you have a house that doesn't have this modern convenience added to the traditional double-hung window, you'll have to pull the trim to access the channels.
Get real replacement sash cords, not nylon (or any other synthetic rope - it won't hold the knots well at all) or cheap cotton cord (not strong enough). It's fairly high-test, and is treated with a very grabby sizing to help it keep the knots. You'll also need a hammer, a large flathead screwdriver or small prybar, a screwdriver for removing and replacing any screws, and a cutting implement. Another thing you want is a long stiff piece of wire with an open hook at one end - a repurposed coathanger is perfect. More on this later.
First, pry off the stop moldings, gently, and set aside. If there is a single cord, or if you are replacing cord before it gives way, cut the cord now. Grasp the lower sash firmly and pull it straight out and set aside, somewhere you won't step into or kick it. I know you won't and you know you won't, but do you want add a trip to the hospital and the home store, plus recreational re-glazing to your day?
Now, if there are screws holding in the access panels, rather than just friction and the pressure of the stop molding, remove them and put them somewhere safe, like a cup. You'll probably find some evidence of previous repairs, as I did. Only two of the prymarks I left behind were mine - the other dozen were already there. Clearly the cords had been replaced before.
Start by prying carefully. There might be a small nail securing the panel (these are under the window trim, where they occur, at my house, which meant either pulling the trim -all of it- or hacksawing the nail). Remove or cut the nail, depending on your level of commitment. The edge that is secured by this mail occurs under the stop moldings at my house, so I just cut the nail. Continue prying gently until the panel pops out.
You may have to pull it out after the leading edge is free, since the center stop molding is still there. One edge is often under that. Once it's out, we get to do the fun part.
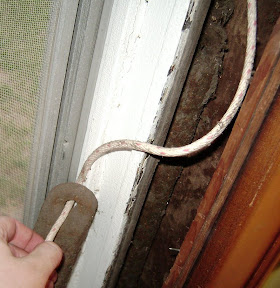
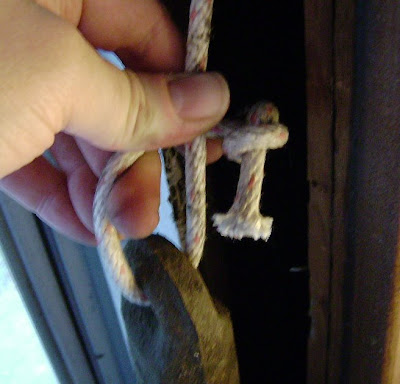
Deeee-lish-us. Reach in there and grab the weight and pull it out. Wear gloves if you like - our weights are iron, but as often, they can be lead. Look at the knot configuration, if you can. You probably can't, if it looks anything like the example weight does:
Let's wrestle that a little bit. This better? No?

Well, okay, I'll demonstrate the not-so-arcane-after-all knotting technique after we get the new cord through the pulley and out where we can reach it. Measure the length you'll need the cords - measure how far down the sash the cord groove goes, plus the length from the top of the pulley to the top of the weight (if you stood it up on the windowsill), and the cord should be long enough. Add three inches if you are worried.
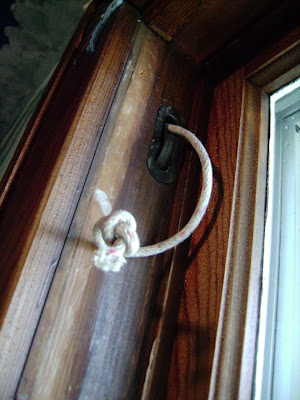
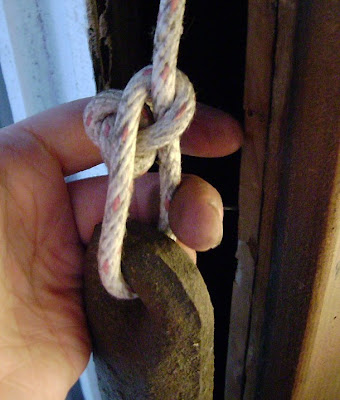
Tie a plain old half-hitch close to one end, and pull it as tight as you can.

If you are really lucky, the cord will just snake down the inside and fall out the opening. However, this is unlikely, so use that long wire hook to fish around up there and pull the cord through.
Tie a plain old half-hitch close to one end, and pull it as tight as you can.
Then thread the other end through the top of the pulley, push every bit through until you get to the knot.
Take the end of the cord and thread it through the hole in the weight. You should have enough slack to do this pretty easily, but not so much that the weight can lie on the windowsill while you work. I propped the weight up in the outer slide channel and the worked fine.
Now, tie another firm half hitch close to the end.
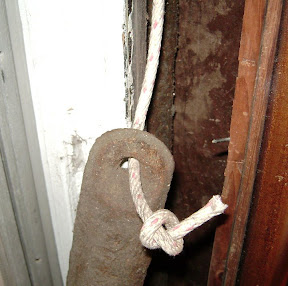
Now, tie another firm half hitch close to the end.
This would be the not-as-arcane-as-you-think knotting method. Next, pull the knot up, wrap it around the cord, and "button" it through the resulting loop. Step 1:
Step 2:
Then pull tight to secure it.
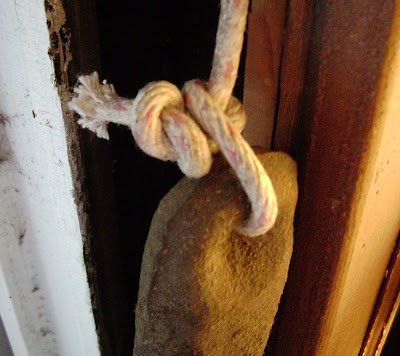
Put the weight back in the weight channel, and close up the access port. Repeat on the other side. Get the sash, and remove any remaining old cords from the cord grooves. Get another person to hold the sash (or prop it on something secure), make sure you've got the right side of the sash facing in, pull the knots down from the pulleys and tuck them into the holes for the knots, then push the cords into the grooves. The sash should now be hanging freely in the window, and shoudl slide easily up and down. Re-install the stop moldings (if you pulled the trim, re-install that, too), and you're done.
01 May 2007
Lock, set, mismatch.
So, things have been quiet on the home improvement front lately. I've done a couple of little touch-up jobs, like scraping away the weird grout bits that I didn't wipe off properly when i grouted the bath, but nothing really worth discussing. This week we have ambitious plans to clear and finish the dining room, but that may have to wait a couple of weeks.
What I did get done was to make the exterior cellar door secure. Warning - excessive use of parentheses follows.
The door concerned is an old, wood and plate glass door, similar to the original front door, but an obviously inferior model. It has, until now, had a rim latch with a little "lock" lever on it, and no other lock. This level of "security" was "reinforced" by a lovely old wooden screen door with a hook latch. Nothing here that would deter a casual vandal, let alone an intent burglar. Fortunately, this is a small town, and pretty safe, so it really wasn't that big of a deal. Til now.
However, I grew up in the city and have the requisite skittishness of someone who grew up with deadbolts on every door. There have been a few sleepless nights over that security hole. Then our insurance agent mentioned that having deadbolts on every entry would lower our insurance premium - so we bought new locks for every exterior door. And didn't install them. Well, okay, we installed them. One at a time, over a period of MONTHS. The new front door got one, and the back door got one, and the cellar door ... didn't.
Tangentially, we had removed the perfectly good, but ugly and unnecessary, aluminum storm windows from the formerly exterior interior windows on the now-enclosed front porch (that's quite a sentence). This gave us three entire storm windows to stick in the cellar. The only glass window in the house that had no protection from hail, or other weatherizing of any kind, was the plate glass cellar door. I had an epiphany, and decided to mount one of the spare storms over the glass panel on this door.
After installing the storm window over the glass panel (It's no prizewinner, looks wise, but I think I can pretty it up with some paint or mouldings.), I finally mounted the plain silver deadbolt we'd bought almost a year ago. That was an exercise in Making It Work - the door had been trimmed on the latch side to fit the frame, probably 80 years ago, and was almost too narrow to mount the lock without damaging the door or the glass. I ended up cutting a much smaller hole than called for by the lock's installation instructions, just large enough to fit the lock's mounting screws through, cutting the tube hole, then using my Dremel's drill saw to carve out just enough space to fit the end of the tube latch into the door. I love my Dremel.
Mounting the the strikeplate on the frame was a pain, as usual, but I managed, after only three false starts. There is now double glass and a deadbolt on the cellar door, along with its old and and ugly, but reliable, rim-mount knob set.
The dear old wooden screen door is coming off, and it will probably get replaced with the old modern storm door (also removed from the now-interior front door), for an extra layer of weather safety. We'll be refinishing the wooden screen door and mounting it on the back screen porch, probably when I get the screencloth put up on the naked screen mounting strips.
On the military front, Chris is finally processed back in. And barely in time - our savings ran out last month, we had to borrow from my mother to get by. He'd taken a leave of absence from work when he was asked to return to active duty, but we had no idea it might take six months, only one month of which was due to Chris training for his physical. Well, everything is okay now, and we're just waiting for orders.
I don't know how I'm going to face moving if we have to. We're just getting started.
11 April 2007
We're Still Here
...but it's raining today.
I wanted to do yardwork today, I had ambitious plans to set out my seedlings. I have beds planned out in my head, but the ground is soggy and it's still a little bit chilly.
They ought to be fine a few more days inside.
I wanted to do yardwork today, I had ambitious plans to set out my seedlings. I have beds planned out in my head, but the ground is soggy and it's still a little bit chilly.
They ought to be fine a few more days inside.
07 April 2007
Terrors in the Night, or Clown House Repairs
...actually, bad/strange/funny dreams with more house relevance, rather than real disasters. Which would you choose? I thought so.
My dream began with us sitting on the front porch, talking (a transcript is not available as the soundtrack has bee lost), followed by an enormous "runch" sort of noise and the building shuddering, with the center third of the house, and only that portion, listing to one side. After much comical sliding around, all of us rush downstairs, to the cellar.
There is an enormous soft spot in the foundation, as if the blocks had deflated. We immediately produce pole jacks from nowhere (I seem to recall them unfolding neatly from our pockets - that'd be nice, wouldn't it?) and jack the house back into its normal position. We're all wearing brightly colored overalls at this point.
Then we produce cans of "inflatable paste" which is then used to repair the wall. I think it's manufactured by the same imaginary company that makes Prognostikote. I don't recall there actually being air pumps, but there probably were. There were balloons, but I'm not sure what they were for. There were the long skinny kind, used for making animals. And a lot of slapstick.
Eventually we finished the repair and went back upstairs.
Do you think my house is trying to tell me something? We haven't had much time to work on it, beyond the Day Of Muck, for several weeks.
Incidentally, I'm not afraid of clowns.
01 April 2007
Curtains for Us!

Here's the best shot yet of the drapes I made for our living room in January. It is difficult to photograph sheers.
The rest of the living room looks like it was ransacked by barbarians (it was - they are 9 months are 4 years old), so it's been cropped out of the shot.

31 March 2007
Pipe Fu
or, A Sunday Visit from Roto-Rooter.
Things smelt rotten in our back yard last Sunday. Inspired by the nice weather to finally mow the lawn, Chris got out the lawnmower and stuck his head upstairs long enough to let me know that I was to stop washing dishes RIGHT NOW. Curious, as he was transmitting information in a clipped, military, need-to-know sort of way, I turned off the water, wandered down the cellar steps and looked out the basement door, into the swamp of sewage around the two-and-a-half foot tall vent pipe.
Chis points and says: "that's why I told you to stop."
I say some things that don't belong in print. I mutter something about "...not n the budget" and "first it won't come in and now it won't go out..." and then come to my senses and thank whoever blessed this house that the sewage backup was outside and not inside. Chris gets out the little bitty pipe snake and discovers this ain't so easy to fix, then we look up Roto-rooter (really the only game in town) and I call my mother and cry (actually bitch, but cry sounds more poetic) about sewage in my yard and a second lack of flushing toilet facilities that week. Then we call the Roto-Rooter guy.
Roto-rooter man comes, gets out the Big Motorize Pipe Snake, spends 3.5 hours drilling through a blockage in the pipe that is apparently composed of plaster and tampons, and clears it, leaving with $280 and an admonition to replace our old sewage line, as it's falling apart (not really news). The good news is that the line is straight to the road, and runs across an area devoid of trees, bushes and other people's foundations. The bad news is that some kids apparently enjoyed stuffing an entire box of tampons (No, I don't flush the things - I grew up with a septic tank that spewed like kid from the exorcist when overloeaded by holiday visits..), plus at least part of the dried plaster slurry from our tool cleaning bucket (that's where the slurry cake that vanished from the back porch must have got to...) down the knee-high vent pipe.
The weird news is that there are two vent pipes. One is under the porch, and, yes, it's connected to the same sewer line. No, we don't know why. Probably nobody now living has any idea. Other good news, I suppose, is that there is some kind of trap preventing backflow to the cellar. I guess we'll find out how that works when we dig up our yard.
Too bad I didn't get pictures of the vent pipe fountaining sewage. It was spectacular, yet disgusting.
23 March 2007
water, water...
Not as bad as it could be. The water main broke, so we (and everyone else here) were without water for a day.
Annoying, since it happened just as I was running a bath, and I'd put the dishes off until after FX was in bed. Inconvenient, since I had to use my bottled water to make coffee this morning. At least the soaking water for those dishes I couldn't rinse was useful ... for flushing the toilet.
I'll admit though, that first thought when I turned the tap and it was dry was, "Okay, what's broken in our plumbing?"
So glad it wasn't us!
22 February 2007
Hibernation
I have noticed our renovation activity hibernating, for lack of a better word, during deep winter. We've got kids in the house, stuff going on (besides an unfinished dining room), it's "seal your house like a ziploc" weather and that means no painting, no powertools, no sanding.
It's frustrating. The most we have been able to do is decrapulate the living areas of the house, and I'm going nuts. Well, okay, I did put up drapes and make a lampshade, but that's girly stuff and I need to wield power tools, sand something, or whip out the paint.
Imagine my relief that we had some false spring today. I crawled out of my cave, scratched my back on a tree, and got to work on the sun porch (the office-to-be). I got to use a Very Small Power Tool - Dremel tools make a satisfying motor-noise, even if it is in the soprano section of the power tool choir. I've now altered all the fake mullions on the modern Andersen casements to look at least sort-of Arts & Crafts. They are now divided into four small square "panes" over one big "pane," and I cannot express how much better it already looks from the road.
I also removed the last two interior storm windows (put up before the porch was enclosed), so we can use the windows to move air through the house from the sunporch. I feel vindicated.
Back to the cave.
05 February 2007
Books!
Ah, a box of research materials arrived today. The other should arrive tomorrow. So far, no love, but I'm sure I'll be popular with the local historical societies if I share these.
I'm going to go roll in my books now. Detailed reviews once I've pawed them all - I'll let you know what they tell me about this place.
I'm going to go roll in my books now. Detailed reviews once I've pawed them all - I'll let you know what they tell me about this place.
04 February 2007
What a difference a latch makes!
We posted a couple weeks ago about ordering a new latch for FX's room, so we didn't need to use bungee cords to keep his door closed anymore. We received it Tuesday and installed it Wednesday. What was the delay? Since I didn't post about this before - we had our Very First Houseguests (waves to C and C all the way in California) and have spent the last couple of days recovering- I'm posting now. Please forgive me, dust covered and paint spotted readers.
A little bit of related news before getting to the mechanical focus of the day: We also ordered a can of Craftsman Furniture Polish and a roll of low-friction tape. The furniture polish is nice, but most of our wood is so very far past only needing polish that it's not a cure-all. We really need to suck it up and refinish our furniture. Works great on the moldings, though. The low-friction tape, however, has made our old and battered bombe front chest of drawers work like a dream, which it never did before. Getting clothes in the morning was like an episode of Ultimate Fighting Championships, and now it's not.
I also made some drapes for the living room, and made a kid-kitchen in our corner cabinet, but the batteries in the camera are dead, so that's another day's news.
Now to the main event:
The latch works great. It makes FX's door actually function as a door should. It even came with all the hardware we might need, though we didn't need anything except the latch and the screws (we also got 2 spare strikeplates and their screws). That said, there are few caveats for anyone else looking to replace a 1910's latch-only assembly. They are:
All in all, the job took about 3x as long, but that's maybe half an hour, considering that a direct parts swap would have taken 10 minutes. I should not neglect to mention that I put the latch in backwards after I'd gotten everything set, and had to pull the knob, the spindle, and the latch and put it all back the right way. And, really, I was prepared for potential difficulties, since repro parts rarely fit exactly like the originals. But, oh, that would have been nice...
The end of the story is that our 4 year old now has a door that works, for his birthday. That would be the other reason for a delay in reporting - we threw a birthday party for him. At Pizza Hut. No, the dining room really isn't ready for six four year olds to be throwing cake in it. It may never be, even if we do eventually get it painted.
A little bit of related news before getting to the mechanical focus of the day: We also ordered a can of Craftsman Furniture Polish and a roll of low-friction tape. The furniture polish is nice, but most of our wood is so very far past only needing polish that it's not a cure-all. We really need to suck it up and refinish our furniture. Works great on the moldings, though. The low-friction tape, however, has made our old and battered bombe front chest of drawers work like a dream, which it never did before. Getting clothes in the morning was like an episode of Ultimate Fighting Championships, and now it's not.
I also made some drapes for the living room, and made a kid-kitchen in our corner cabinet, but the batteries in the camera are dead, so that's another day's news.
Now to the main event:
The latch works great. It makes FX's door actually function as a door should. It even came with all the hardware we might need, though we didn't need anything except the latch and the screws (we also got 2 spare strikeplates and their screws). That said, there are few caveats for anyone else looking to replace a 1910's latch-only assembly. They are:
- It's a little bit smaller. Lengthwise. Just enough (perhaps a sixteenth of an inch?) to make the spindle not line up with its original hole.
- This causes power tools to come out during an install. When one has to enlarge a hole to allow the spindle to move (we could get it through, once the faceplates were off the door, but it didn't move), it's time for Mr. drill.
- This also causes the faceplates to need moving over, so they line up with the new hole. Another job for Mr. Drill.
All in all, the job took about 3x as long, but that's maybe half an hour, considering that a direct parts swap would have taken 10 minutes. I should not neglect to mention that I put the latch in backwards after I'd gotten everything set, and had to pull the knob, the spindle, and the latch and put it all back the right way. And, really, I was prepared for potential difficulties, since repro parts rarely fit exactly like the originals. But, oh, that would have been nice...
The end of the story is that our 4 year old now has a door that works, for his birthday. That would be the other reason for a delay in reporting - we threw a birthday party for him. At Pizza Hut. No, the dining room really isn't ready for six four year olds to be throwing cake in it. It may never be, even if we do eventually get it painted.
25 January 2007
Locks and shades
Today I did something we've put off for months, with no good reason. I removed this from my son's bedroom door:  It looks fine, I suppose, but there's another facet to the problem. The latch itself is snapped off, even though the rest of the mechanism is fine:
Our three-almost-four-year old has been living in this room now for a month, without a door that closes properly. Ihat's fabulous if one only worries about escaping during a fire, but horrible if you want to be able to hear your toddler escaping during his nap. We've been making do with a bungee-cord hooked from his doorknob to the moulding, but it's both ugly and not great for the woodwork, not to mention not being ideal, safety-wise.
Today I took a step towards not jerry-rigging it, and ordered the replacement latch from Vandyke's that we had picked out ... Last August. It's ideal - same dimensions, comes with replacement strikeplates in case the original we have doesn't work with it, and it's relatively cheap.
For the curious, the works of the latch looks like this:
I may have mentioned that we had bought a replacement lightkit for our living room ceiling fan, and found that you can't get the kind of light we want (a single shade uplight)to work on the ceiling fan we have. I also do not wish to spend $150+ for a fan at this time to get what we want. The lights on the fan have been driving us nuts, however, as they are downlights just about perfectly angled to be regarded as interrogation lights AND the "shades" are actually clear glass, unfrosted, convex-petaled tulip shapes that function more as lenses to concentrate the light than as any sort of diffusion device. We have to live with this thing, but we can't stand it. In short, "ow."
Yesterday, I got tired of "badly designed light fixture"-induced migraines, and decided to do something about it. We went from this:
to this:

I built it out of card, armature wire, copper tooling foil (bought for another project and then not used - if I do this again I'll use copper flashing as it's WAY more cost effective), glue (duh), aluminum foil (to line the reflector panels with), and a scrap of the indigo-dyed organdy that I'm making my sheer curtain panels from. Soooooo much better. It's like breathing fresh air after being in a stuffy room, or putting on sunglasses in the middle of a scorching Texas summer day. I plan to reinforce it with square wood dowels in a week or so (I have them, but they are still at my mother's house), since it's bowing a bit from the pressure of being mounted, but overall, I'm very pleased.
If you'd like to make a shade yourself, I highly recommend this book. This wasn't the first shade I've made (I have made several Japanese style wood-and-ricepaper shades and a few cloth ones), but it was my first copper-and-card one. The book made a great reference for shaping, though it's not a design from the book, there are several similar projects.
 It looks fine, I suppose, but there's another facet to the problem. The latch itself is snapped off, even though the rest of the mechanism is fine:
Our three-almost-four-year old has been living in this room now for a month, without a door that closes properly. Ihat's fabulous if one only worries about escaping during a fire, but horrible if you want to be able to hear your toddler escaping during his nap. We've been making do with a bungee-cord hooked from his doorknob to the moulding, but it's both ugly and not great for the woodwork, not to mention not being ideal, safety-wise.
Today I took a step towards not jerry-rigging it, and ordered the replacement latch from Vandyke's that we had picked out ... Last August. It's ideal - same dimensions, comes with replacement strikeplates in case the original we have doesn't work with it, and it's relatively cheap.
For the curious, the works of the latch looks like this:

I may have mentioned that we had bought a replacement lightkit for our living room ceiling fan, and found that you can't get the kind of light we want (a single shade uplight)to work on the ceiling fan we have. I also do not wish to spend $150+ for a fan at this time to get what we want. The lights on the fan have been driving us nuts, however, as they are downlights just about perfectly angled to be regarded as interrogation lights AND the "shades" are actually clear glass, unfrosted, convex-petaled tulip shapes that function more as lenses to concentrate the light than as any sort of diffusion device. We have to live with this thing, but we can't stand it. In short, "ow."
Yesterday, I got tired of "badly designed light fixture"-induced migraines, and decided to do something about it. We went from this:

to this:

I built it out of card, armature wire, copper tooling foil (bought for another project and then not used - if I do this again I'll use copper flashing as it's WAY more cost effective), glue (duh), aluminum foil (to line the reflector panels with), and a scrap of the indigo-dyed organdy that I'm making my sheer curtain panels from. Soooooo much better. It's like breathing fresh air after being in a stuffy room, or putting on sunglasses in the middle of a scorching Texas summer day. I plan to reinforce it with square wood dowels in a week or so (I have them, but they are still at my mother's house), since it's bowing a bit from the pressure of being mounted, but overall, I'm very pleased.
If you'd like to make a shade yourself, I highly recommend this book. This wasn't the first shade I've made (I have made several Japanese style wood-and-ricepaper shades and a few cloth ones), but it was my first copper-and-card one. The book made a great reference for shaping, though it's not a design from the book, there are several similar projects.
17 January 2007
Castles in the Sky
Or, "Cabinets in the Kitchen." It makes no difference, because one is as real as the other, unfortunately.
However, dreaming can be fun, so I downloaded the Ikea kitchen design software and went on with my imagined redesign of the kitchen. I'd been playing with various configurations for some time in my other 3 remodeling software packages, but this really works well 9this year - last year's crashed on me too much to bother with). We're considering Ikea as a source for reasonably priced cabinetry that we can install ourselves, so this gave me a nice idea about how much it might be to get the whole mess from them (under 7 grand, including fripperies like a stove and a dining area, and not including shipping). There's the added fuzzy of following a kind of tradition - the house and everything in it having originally been ordered from catalogs - even if this is just a pipe dream.
First, here is a rough approximation of what we've got now, Ikea-style:

I'm guessing, from the five or so cabinet doors we found cobbled into a shelf in the cellar, that there was a basic kitchen built-in on the side where the counter is now, possibly also an icebox. The corner cabinet I roughed in in this is a homemade affair, cobbled together (fairly well, actually) form odds and ends of plank and tongue-and-groove boards, and goes from floor to ceiling. I like the midcentury steel cabinets, but they don't go with the house, and we need more storage and more counterspace.
Problems with the kitchen as it stands:
So I have a few things in mind to change, and some things to restore. I started out with a bare room and the knowledge that the original location of the kitchen sink was where the range is now, the stove had been in the inset where our dinette is now, and went from there. I got this:

Wow. I went with one of the more traditional "modern" cabinet fronts, "Ädel," on "Medium Brown," as it seemed more like what was once here. I put the range in the original location of the cookstove, I moved the refrigerator over and put tall cabinets between it and the partial wall for expanded storage (including a broom/cleaning storage closet, which we do not now have), put cabinets on the stove wall, filling the awkward inset with useful things, and relocated the sink to the original sink location, under the short window.
In order to avoid removing or obscuring original features (the long windows, which let so much wonderful light into the kitchen), I elected to put kitchen carts or some other portable storage/workspace solution on either side of the sink. And the dining area? Where the existing sink is, so nobody gets elbowed or bumped during breakfast. The sink I picked is one of two that I really love in the Ikea catalog, the one that looks like a vintage farm sink.
It's so much more usable that I just want to buy it NOWNOWNOW. Of course, this is not possible, and will entail a great deal more than seven thousand dollars, such as living without a kitchen for a couple of weeks while we move plumbing around and install everything. Never mind the money.
However, dreaming can be fun, so I downloaded the Ikea kitchen design software and went on with my imagined redesign of the kitchen. I'd been playing with various configurations for some time in my other 3 remodeling software packages, but this really works well 9this year - last year's crashed on me too much to bother with). We're considering Ikea as a source for reasonably priced cabinetry that we can install ourselves, so this gave me a nice idea about how much it might be to get the whole mess from them (under 7 grand, including fripperies like a stove and a dining area, and not including shipping). There's the added fuzzy of following a kind of tradition - the house and everything in it having originally been ordered from catalogs - even if this is just a pipe dream.
First, here is a rough approximation of what we've got now, Ikea-style:

I'm guessing, from the five or so cabinet doors we found cobbled into a shelf in the cellar, that there was a basic kitchen built-in on the side where the counter is now, possibly also an icebox. The corner cabinet I roughed in in this is a homemade affair, cobbled together (fairly well, actually) form odds and ends of plank and tongue-and-groove boards, and goes from floor to ceiling. I like the midcentury steel cabinets, but they don't go with the house, and we need more storage and more counterspace.
Problems with the kitchen as it stands:
- As you can see, there's LOTS of wasted space.
- The current sink location is both counterintuitive and just plain bad - the supply and waste pipes go through an unheated space under the original back porch).
- There's kind of a work triangle, but not really.
- If we want a vent hood, we will have to cut through the outer wall of the house if the stove stays where it is. Not good.
- There's no eating in the kitchen without traffic bumping into the hapless person next to the door.
So I have a few things in mind to change, and some things to restore. I started out with a bare room and the knowledge that the original location of the kitchen sink was where the range is now, the stove had been in the inset where our dinette is now, and went from there. I got this:

Wow. I went with one of the more traditional "modern" cabinet fronts, "Ädel," on "Medium Brown," as it seemed more like what was once here. I put the range in the original location of the cookstove, I moved the refrigerator over and put tall cabinets between it and the partial wall for expanded storage (including a broom/cleaning storage closet, which we do not now have), put cabinets on the stove wall, filling the awkward inset with useful things, and relocated the sink to the original sink location, under the short window.
In order to avoid removing or obscuring original features (the long windows, which let so much wonderful light into the kitchen), I elected to put kitchen carts or some other portable storage/workspace solution on either side of the sink. And the dining area? Where the existing sink is, so nobody gets elbowed or bumped during breakfast. The sink I picked is one of two that I really love in the Ikea catalog, the one that looks like a vintage farm sink.
It's so much more usable that I just want to buy it NOWNOWNOW. Of course, this is not possible, and will entail a great deal more than seven thousand dollars, such as living without a kitchen for a couple of weeks while we move plumbing around and install everything. Never mind the money.
10 January 2007
Writer's Block, or Living in the Project
 NOTHING says "house restoration" like patched plaster walls, an extension cord, and a bale of toilet paper. Except possibly the direct view to the bathroom from the front door, and a nifty sepia effect courtesy my camera.
So, here I am, camera in hand, readied to relate the news of living in the house for a whopping 2 weeks, and I find that my grasp of words has failed me.
Utterly.
I find myself thinking "Kitchen ... NO! Bathroom ... wait. Bedroom. Plaster? Yardwork? Snow?" This is followed by a dull moaning sound as my brain's gears fail. Madly, I continue to hunt for things to write about, grasping at "Scrubbing floors, perhaps? Or the kitchen drains? Oooo! How about the cellar?"
I'm not short of things to write about. I'm spoiled for choice. My brain is whirling like a magpie in a sequin factory. Too much to do, too much to tell, not enough focus.
Therefore, with this decision (or lack thereof), I give you some photographs. And some captions. That's all I can muster right now.

 Bath, before and after. See if you can guess which is which! My best clue for you is that there's no Homart plastic tiles in the restored bathroom. Or pink. I'm not a pink person.
 Here's the Original Medicine Cabinet, the one I bragged about finding so long ago, in her almost completed state (note the smears of wood filler). All installed, but not really finished yet. I'm putting off the rest of the paintjob until I get time to pull and strip (or replace with chrome copies) the hardware. The existing stuff is brass and would look ... odd, with the rest of the bath hardware being chrome.
Look, that's food in the kitchen, and not tools! Okay, some of those are tools, but mostly it's actual kitchen stuff. We can cook in here now, as of about a week ago. The first week, though, it was pretty grim, and we didn't get the tools packed of to the cellar until we were nearly starving for a lack of cooking space.

 And, as promised, an image of (part of) the Giant Bed. It really does barely fit in the expanded master bedroom. This was the best picture I could get, as it's what was framed in the door. That's the baby napping on the bed, he gets his crib tomorrow. It's huge.
  I will close with an image of the no-longer-hellish dining room ceiling, with the pretty, new, unfinished, "beam" for all to see. The real beam is actually much further up in the wall, and the posts against the walls are as cosmetic as the cladding over where the beam ought to be cosmetically (structurally, it's fine where it is). Don't look at the piles of boxes, please. Just pretend they aren't there.
That's what we do.
06 January 2007
Connected
We're online now, but the camera, being Mom's, didn't come with us, so pictures of the house have to wait until we get one of our own.
Still so much to do, but at least now it's home.
Still so much to do, but at least now it's home.
Subscribe to:
Posts (Atom)